
When HubSpot introduced marketing contacts, making it possible to keep contacts that users don’t want to actively market to in HubSpot CRM, it simplified management of business contacts within a single platform without the extra expense of holding onto all those non-marketing contacts.
Paying only for contacts you market to? Pretty exciting.
It’s important to note that if you go over your marketing contacts limit, you’ll be charged for the next tier of contacts until at least your contract renewal date. So setting up and automating marketing contacts management is the answer for optimizing your savings and improving efficiency.
Let’s take a look at how to set up marketing contacts and automate management to protect your bottom line and uphold the value and hygiene of your CRM.
The key to capturing the value of differentiation in your database is actually designating marketing-eligible and ineligible contacts. HubSpot Academy’s content library includes courses like this one that can get you started, with free online video lessons.
Remember, non-marketing contacts can still receive 1:1 emails from the CRM software — but not using Marketing Email tools. So keep contacts in marketing status whom you need to target with ads or email sends that include:
If you’re already a HubSpot user and are switching to Marketing Contacts, you should run an initial eligibility flow to get below your limit and determine the right number of Marketing Contacts you want in your license. An eligibility flow can be run at any time, so even if you have Marketing Contacts right out of the gate with your HubSpot license, you can use it to bulk change contacts to Non-Marketing as needed.
You can choose to set bounces, unsubscribes, and contacts who’ll never be qualified to buy (for us these have Lifecycle Stage of “other”) as Non-Marketing, so they don’t count toward your limit. You can also add custom filters and your own smart lists to refine further. And if your Marketing Contacts are still too high, you can tweak and re-run your eligibility flow.
Make sure controls are in place to limit who can and can’t set contacts to marketing. You can restrict specific users by revoking their permissions in your HubSpot settings with a simple toggle switch.

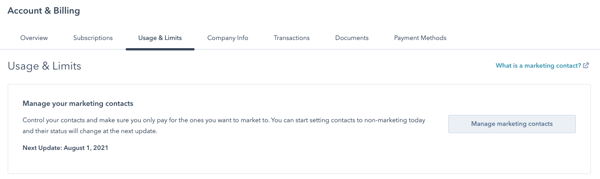
In your HubSpot portal, your account is updated daily to reflect your current number of marketing contacts. Set yourself up as a billing admin to make sure you receive notifications, and you’ll be notified when your marketing contacts hit 75%, 90%, and 98% of your current tier.
Of course, you’ll be notified when you exceed your tier, but the idea is to make sure you don’t move up before you actually need to.
Pay close attention to contact/list imports. The import wizard won’t alert you if a contact import might push you over your limit. That’s another good reason to place tight controls on your user permissions.
Some sources can be customized and others can’t. This HubSpot Knowledge Base article goes into detail about it. Sources to review include forms, chat flows, integrations, imports, and more. You’ll want to review each customizable source individually to decide whether the contacts it delivers belong in your marketing set or among non-marketing contacts.
For the sources that you can’t customize, you can determine automation criteria and workflows to change them from non-marketing to marketing, or vice versa.
For example, a workflow to change default non-marketing contacts into marketing contacts might be based on the contact’s lifecycle stage to ensure all qualified leads are able to receive marketing emails and ads.
And in the other direction, a default marketing contact could be switched to non-marketing based on email bounces or opt-outs. In the case of this workflow, be sure to turn on re-enrollment, because if the contact converts on another website form, they can be sent through the workflow again to revert to non-marketing.
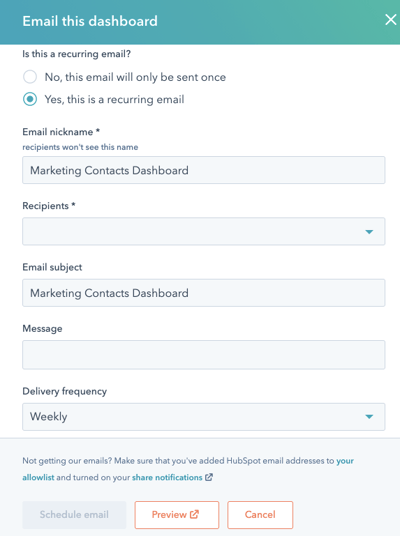
In HubSpot reports, create a new dashboard and select “marketing contacts” from the library. Choose your preferred report customizations, if any, and set up a recurring email notification to remind you to review whether actions are needed to stay below your limit.
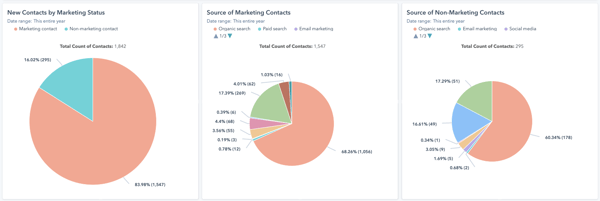
There’s more value in these reports than simply staying under your contact limits. To help us know how our marketing is doing in terms of generating quality contacts from the website, and which channels are generating quality contacts, we created and added three custom reports to our dashboard:
HubSpot recommends — and common sense supports — setting up a standardized process for cleaning up your CRM data. A regular, documented routine helps your users identify gaps or inaccurate information and correct, remove, or complete contact entries. At Weidert Group, we use Insycle on a quarterly basis to help keep our housekeeping efficient and effective. In addition, we have HubSpot workflows that automate setting certain contacts as non-marketing on an ongoing basis.
Determine whether you want to delete hard bounces or keep them in your CRM with non-marketing status. If you’re using Insycle, map the list to a HubSpot CRM list and run a workflow or use “Contact Views by List Membership” to execute a bulk change to non-marketing.
Unless you’re bumping up against your contacts limit, it’s usually recommended to only remove hard bounces when the reason is “unknown user,” which means the email address is truly dead.
HubSpot recommends importing contacts as non-marketing and using automation criteria to set marketing contacts. Depending on how close you are to your limit, and the nature of the list you’re importing, it might make sense to import certain lists as marketing contacts.
Create and save Contact Views filters in HubSpot to evaluate whether any non-marketing contacts may need to be switched over to marketing. You can bulk change any or all of the contacts on the list from the filtered view. This helps ensure contacts you want to receive marketing emails are eligible to, especially your customers.
An example of filter criteria you could use to review customers who are incorrectly categorized could be:
A streamlined CRM with reliably differentiated marketing and non-marketing contacts helps boost efficiency across all your teams — marketing, sales, service, and more — while ensuring that you’re not paying for contacts you don’t need. And automation can save even more time and effort, further reducing friction across your own operations.
Visit our resource page, Why Go HubSpot for Inbound Success to learn more about why we choose to work exclusively with HubSpot to help our clients (and us!) put the inbound methodology to work supporting business growth. Click the link below to see for yourself, and then request a consultation with one of our experts.
Topics: Marketing Technology, Marketing Automation