
A sitemap is a file that lists the pages within your website. Sitemaps live on your server and help web crawlers understand the structure of your website so they can find your content and index it so people can find it on search engines like Google, Bing, and Yahoo. For webmasters, though, sitemaps are an easy, low-maintenance way to get a quick SEO boost.
HTML and XML sitemaps are two different formats used to organize and catalog the various pages and content of a website. The primary difference is that HTML sitemaps are designed to be used by website users as a navigational tool, and XML sitemaps are used exclusively by search engine crawlers to index and crawl a website's content.
HTML sitemaps are essentially an archive of all the pages on a website, structured in a user-friendly format. They make it easy for visitors to find and navigate to the information they're looking for. However, some marketers view HTML sitemaps as outdated or even entirely unnecessary. The view is that you are better off having a user-focused type of organization: arrange your articles by topics, and make discovery easier.
For SEO purposes, sitemaps are usually written in XML, a common markup language. These XML sitemaps might look like a long list of URLs to us, but they are a perfect map of your website for search engine bots. From your XML sitemap, bots learn where your pages are on your website (and how they connect), the URLs for important videos or images on your site, and a little about each page, like whether it’s canonical or if it’s a translated version of another page on your site.
More so, a sitemap aids in the discoverability of new or recently updated content. Whenever new web pages are added or existing ones are modified, updating the sitemap alerts search engines to crawl and index these changes. This ensures that search engines are up to date with the latest content and can display it in search results promptly.
Additionally, a sitemap is particularly beneficial for larger websites with numerous pages. Without a sitemap, search engines and users may encounter difficulties in navigating and reaching certain pages buried deep within the site's architecture. With a sitemap, they become more accessible, ensuring discoverability for the full website.
Every website should have an XML sitemap. It takes very little time and expertise to set it up (it might already be done for you), minimal maintenance after it’s uploaded, and it gives your website more visibility on the web, meaning more potential readers and buyers. Luckily, making an XML sitemap and submitting it to Google and other search engines isn’t hard. All it takes is a bit of time and six easy steps.
1. Check to see if you already have one
There’s a decent chance your site already has an XML sitemap, so make your first job to confirm you actually need to create one.
The easiest way to check is to type your domain followed by “/sitemap” or “/sitemap.xml" into your browser's address bar.
For instance, with gaming website IGN, you can access their sitemap by typing in “https://www.ign.com/sitemap.xml”
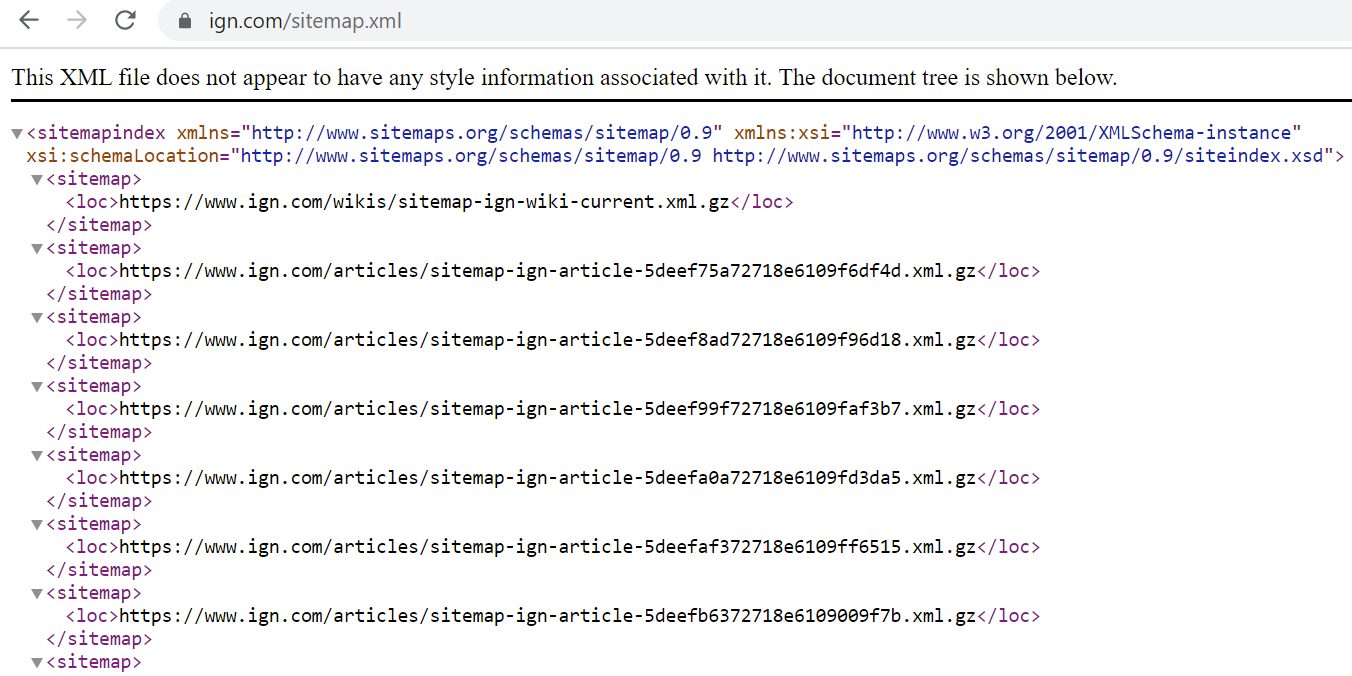
Another way of checking is to use a sitemap checker tool. Look up your domain, and the tool will tell you whether that site has an associated sitemap.
Depending on your content management system (CMS), your website may already have an automatically generated sitemap that will keep itself up to date (also called a dynamic sitemap).
If you’re using any of the following CMSs, you don’t need to worry about making or updating your own sitemap:
For all others, check your CMS’s documentation to see whether or not they generate a sitemap for you. If you already have a sitemap, skip Steps 3 and 4. However, you should still follow our other steps to give you the chance to optimize your site structure and submit your sitemap to search engines.
2. Plan your site structure
Before you go about creating your sitemap, check to see if your website’s site structure is optimized for better SEO and indexing. Your site structure is how your site’s pages are laid out and connected to each other.
For instance, if you have a section of your website devoted to snowboard reviews, you want all of your pages about snowboard reviews to fall into the “snowboard review” category that falls just beneath your homepage. When done right, it could look something like this:
- Homepage: dansextremesports.com
- Snowboard Review Main Page: dansextremesports.com/snowboard-reviews
- Individual Review: dansextremesports.com/snowboard-reviews/snowshredder-2021
Organized this way, search engines and users can easily find all the content you have on snowboard reviews, and it’s this structure that will be captured in your sitemap.
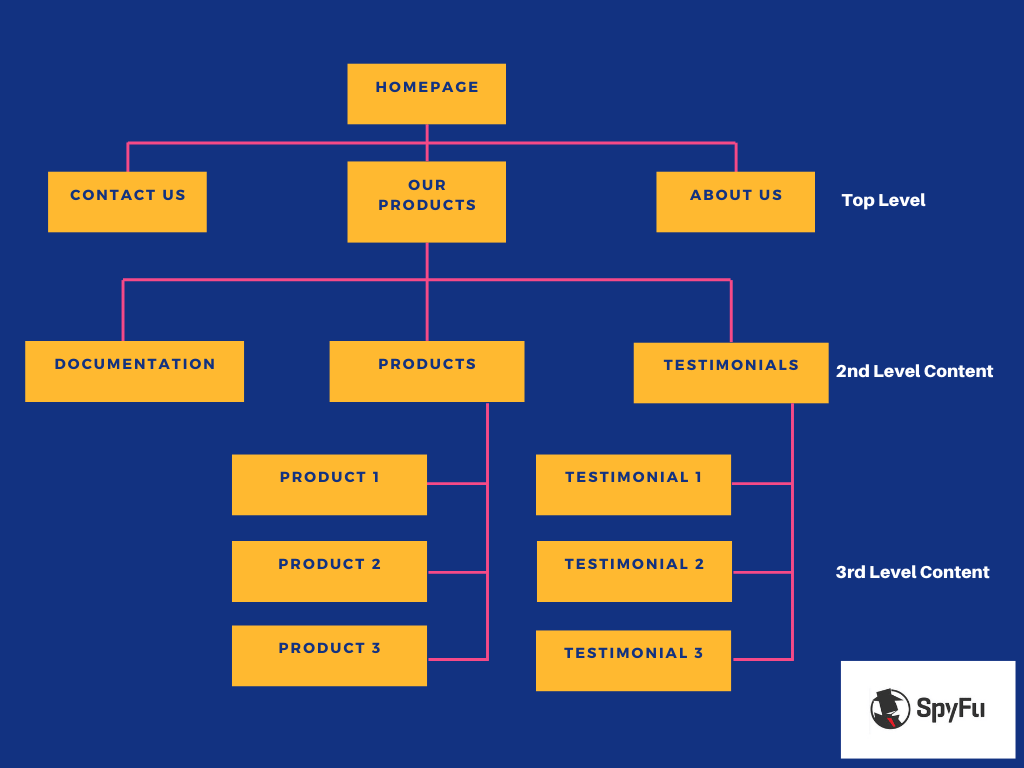
The best site architecture is shallow, meaning no more than three clicks from your homepage to any other page on your site. This kind of architecture makes it easier for readers to access your content and helps bots better index it because it doesn’t require them to navigate through as many pages to get the info they want.
If your site is new, sketch out exactly how your site will be organized by sorting your planned pages by theme and importance level. Top-level content is the main pages you’d see on your homepage menu, while 2nd or 3rd level content would be more specific pages that would be navigated to from their respective top-level pages.
For older websites, optimizing site structure can be challenging because moving content around (changing its URL) risks its current SEO value. If you find your current site is unorganized, you have a couple of options:
- Move content to a new URL and use a 301 redirect to tell users and Google of the move (could affect rankings)
- Begin to place new content in your improved site structure
- Delete old content (that isn’t ranking well) and create new, refreshed content in a more organized place in your site structure
Depending on your situation, a mix of all three would be ideal to slowly move yourself to a better site structure.
In the meantime, work on your internal linking to improve your indexing. Do this by mapping out your current content with a visual sitemap tool and finding opportunities to improve internal linking between relevant pages. So, if you have a higher-level category page about insurance and multiple lower-level pieces about kinds of insurance, make sure you have internal links connecting all the lower-level pieces to the primary insurance page. As well, connect the lower-level kinds of insurance pages to each other wherever it makes logical sense. Increased internal linking can give your content an SEO boost by strengthening the overall topic cluster they're a part of.
By improving your site structure and internal linking, you improve your SEO by:
- Identifying (and removing) duplicate content
- Improving UX
- Strengthening topical authority
- Boosting your indexability
When you’ve finished optimizing your structure and internal linking, it’s time to generate your sitemap. If you are going for the slow and steady approach of gradually improving your structure over time, continue on to make a sitemap now (if your CMS isn’t doing it for you already), and you can redo your sitemap when your changes are done.
3. Generate a sitemap
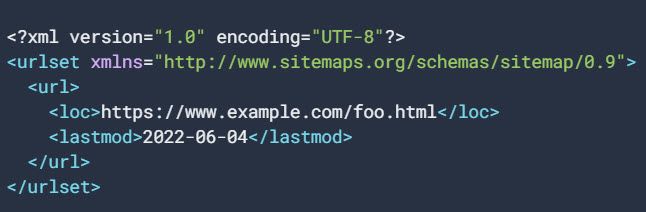
You could manually generate a sitemap by determining which pages should be crawled by Google, deciding on the canonical version of each (see more on that below) and ensuring each page has a unique URL. Once you have your list, you code all your URLs in XML tags including the date it was last modified, and the frequency of updates.
However, this can also be the easiest step in the process. An automatic sitemap generator saves time and, cutting down chances of errors, it is probably more effective.
Several free tools will generate an XML sitemap for you. We’ve listed the best ones depending on your situation.
For WordPress users, consider using one of WordPress’ many plugins. Popular sitemap choices include:
If you’ve already got the paid version of an SEO tool, see if they offer a sitemap generator as a part of their plugin. Many popular SEO tools do.
For everyone else, you can generate a sitemap using third-party software. Two easy options include:
With XML-sitemaps.com, simply enter your domain on the line and let it scan your website. When it finishes, you can download an XML sitemap file to use in the next steps. This program will create a sitemap for a website of up to 500 pages. After this, you’ll need to pay for the Pro account, which costs $41.88 for a year.
Another popular option is Screaming Frog, which will also create an XML sitemap for free for websites with up to 500 pages. For larger websites, you’ll need to pay £149 a year. Of course, this price is more than xml-stemaps.com, but Screaming Frog can also help with other SEO tasks like site auditing.
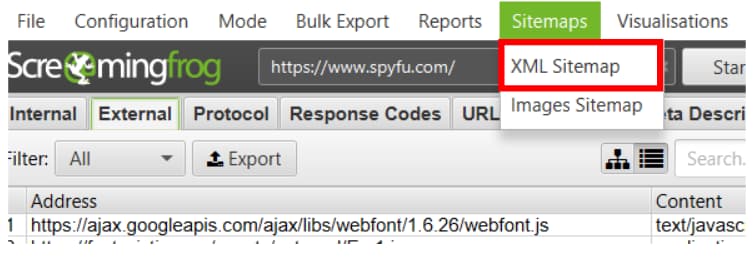
To use Screaming Frog, install the program, open the application, and type in your domain’s URL.

Once the spider has finished crawling your site, click on “sitemaps” and select “XML Sitemap” from the drop-down menu.
Next, a pop-up will appear with a few options. We recommend you leave these options unchecked other than “PDFs.”
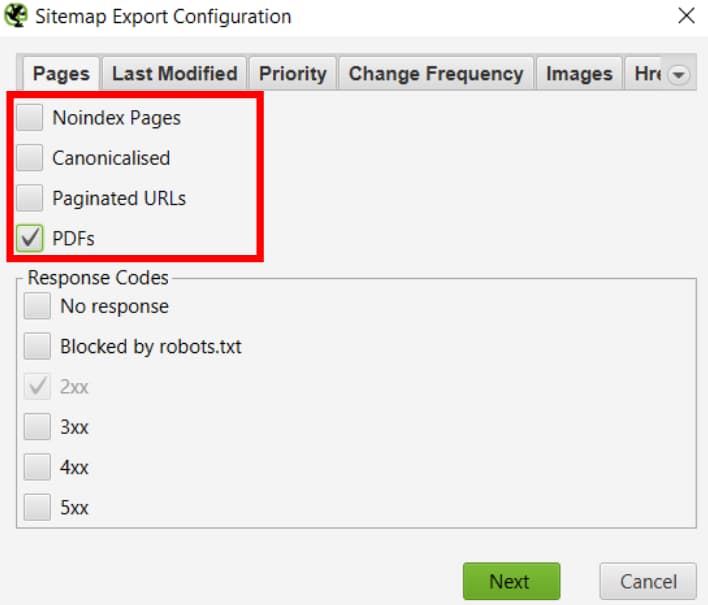
The other selection we’ll make is to add images to your sitemap. By adding images, you can make it easier for search engines to index your images on image searches. To include images in your sitemap, click on the “Image” tab, and select “Include Images.”
When you click “Include Images,” the third box (“Include only relevant images…”) will be checked automatically.
Finally, click Next, and you’ll download your XML sitemap file. Now we can upload your file on your website for crawlers to find.
Prioritize High Quality Pages
When creating a sitemap, you can prioritize high-quality pages. The objective is to get them crawled and indexed by search engines faster. To do this, assign values ranging from 0.00 to 1.00 to each page according to its importance. (1 is most important.) However, using the same value for all pages will not be effective. By assigning different values to each page, search engines will be able to identify which pages are more important relative to each other.
The homepage should be assigned the highest value of 1.00. Main landing pages should also be given a high priority with a value of 0.90, as well as other landing pages with a slightly lower value of 0.85.
Pages that are linked on the main navigation bar should also be given a relatively high value of 0.80. Other pages on the site, including articles and blog posts, should be given a priority value of 0.75. Within articles and blog posts, top-performing articles, such as hub pages, can be given a higher value of 0.80 in order to prioritize them.
Blog category pages should be assigned a value of 0.75, while other posts may be assigned a lower value of 0.64.
Now having said all that, Google may or may not take your priority rankings into consideration. There is some debate as to whether it matters, but if you feel some pages might need a boost from prioritization then it can't hurt to try it.
Canonical Pages
Do not include pages in your sitemap that are considered non-canonical. That could lead to conflicting information being sent to Google and other search engines.
As a refresher on canonical pages, you might have a few pages that cover the same content to the point that some text is nearly identical. Maybe one is an older version of tuition fees that you need to keep active for students that are locked into an earlier plan. The new tuition fee page is the one that you want Google to index, so you make it canonical.
The older tuition page is non-canonical. You would not add it to your sitemap.
The canonical version of a page is the preferred version that you want search engines to index. You should also consider factors such as duplicate content, URL parameters, and HTTP vs. HTTPS versions. Once you have determined the preferred version of each page, you can specify it using the rel="canonical" tag.
Different Types of Sitemaps
Google lists other types of sitemaps that could be good options for very focused websites.
Page Sitemap: This is the standard type of sitemap. It includes all the pages and posts on your site. It can also cover video pages and images when they are not the driving focus of your site. The best practice here is to mark them up with the image object schema.
Image Sitemap: This is ideal for pages like Unsplash or iStock where images comprise most of the site's pages.
News Sitemap: If your site includes news articles, separate them into their own news sitemap. That should help you track their engagement more easily in Search Console.
Video Sitemap: The videos should closely match your business expertise, like one that helps customers troubleshoot your product. Use this type of sitemap when your content leans heavily on videos. Otherwise, you can add the video link to your page sitemap.
If you have multiple sitemap files, you can create a sitemap index file to list all the individual sitemaps you created. The sitemap index file should use the <sitemapindex> tag and include a <sitemap> tag for each individual sitemap file. Within the <sitemap> tag, you should specify the <loc> tag to indicate the location of each sitemap file.
4. Add your XML sitemap to your website
For most sites, adding an XML sitemap to your website will require you to access your root directory through cPanel, a control panel for web hosting platforms. cPanel is a GUI designed to make it easy for non-coders to make changes to the more technical aspects of their websites, like adding a sitemap.
Most popular hosting platforms like Bluehost, GoDaddy, and HostGator include cPanel for free as part of their services. However, if you use a different web hosting platform, double-check whether you have access to cPanel with a quick Google Search or a look at your web host’s documentation.
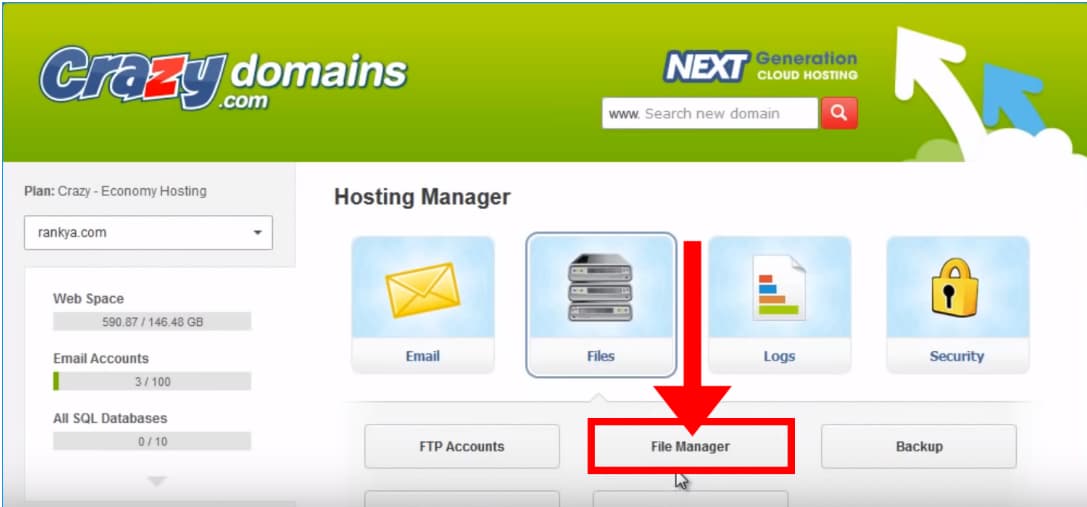
To add your XML sitemap to your website, start by signing into your cPanel file manager. If you don’t know your login information (your hosting platform should have given it to you), you can recover the information by following this recovery process or check with your hosting platform.
Once you log in, click on “File Manager.” Depending on your hosting platform, this page will look a little different.
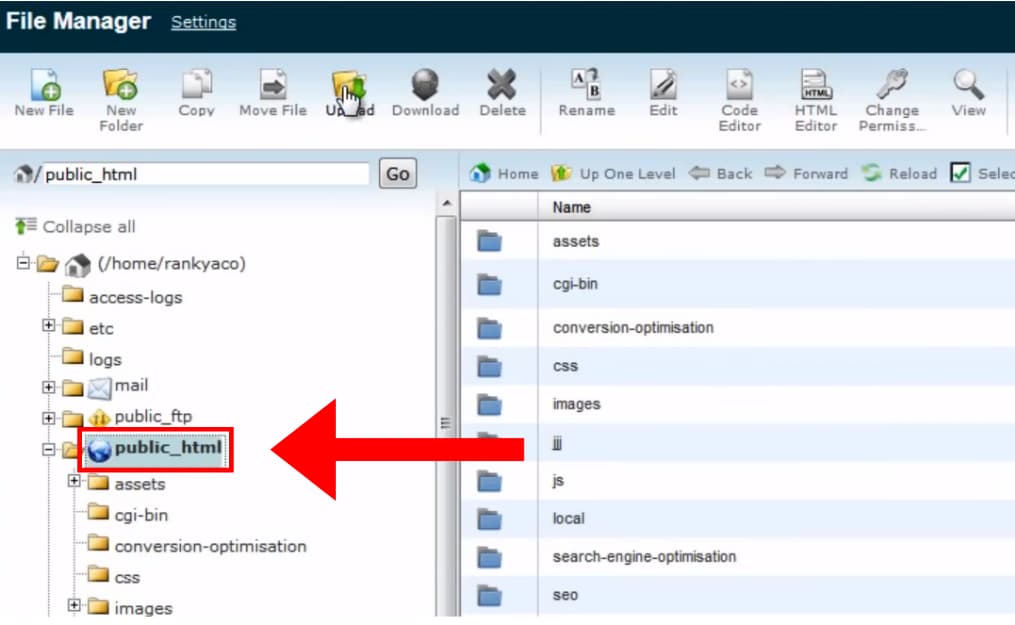
Once you’re in the “File Manager,” click on “public_html” on the left-side menu bar.
Then, click “Upload” on the top bar.
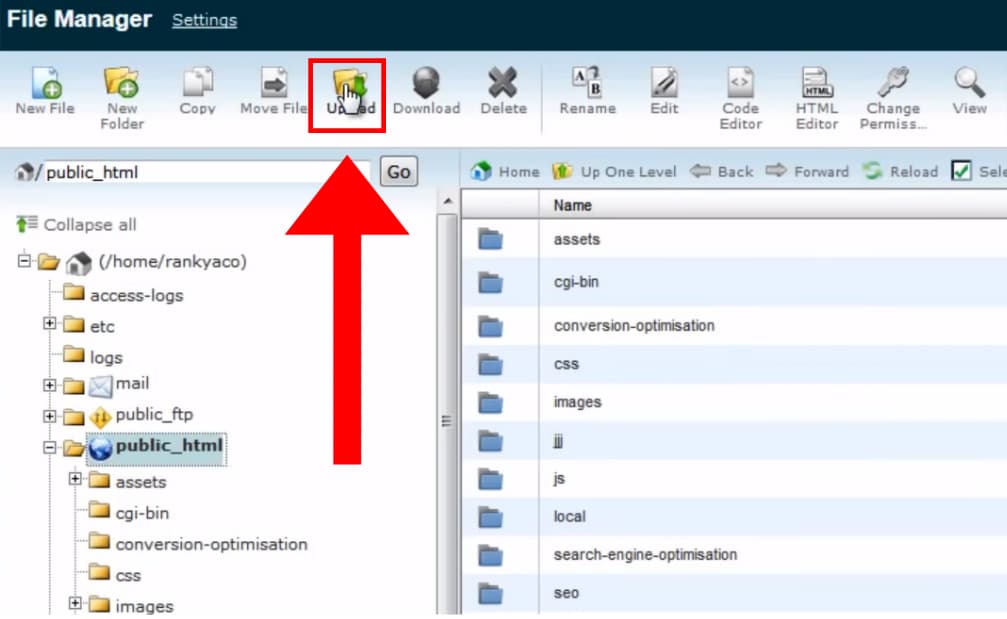
Select ‘Browse’ and upload your XML sitemap to the cPanel. Now that your XML sitemap is uploaded double-check that everything has worked using the methods outlined in Step 1.
While you’re in your cPanel, take a moment to update your robots.txt file to include the URL of your new sitemap. The robots.txt file is a file on your website that tells crawlers which URLs to crawl (and not crawl). It’s considered best practice to add your sitemap URL to the robots.txt file to help crawlers find your sitemap easier.
The robots.txt file should be in the same public_html file where we uploaded your sitemap. Simply open the file and add:
Sitemap: https://www.yoursite.com/sitemap.xml
Don’t worry about where you paste this in your robots.txt; it won’t make a difference. Just put it on a new line. When you finish, press “Save Changes.”
With your website completely updated, you can now update Google and other search engines of your new sitemap.
5. Submit your XML sitemap to Google Search Console
You’re now in the home stretch. With your sitemap created and uploaded to your website, you just need to submit it to search engines. The most important search engine to submit it to is Google.
To submit a sitemap to Google, log in to your Google Search Console (GSC) account. If you’ve not set up GSC for your website, do that first.
Once you’re done, log in to your GSC account and click on “Sitemaps” on the left-side menu. Then, add the URL of your sitemap in the “Add a new sitemap” box. If you don’t see it, make sure your Google account has owner permissions.

If everything is successful, you should immediately see the status beside your sitemap read as “success.” It will, however, take some time before your site actually gets crawled.
Once Google finishes crawling your site (this could take a couple of weeks), return to GSC and check that all of your important pages have been indexed. Unfortunately, you won’t get notified when your site gets crawled, so check your Sitemaps Report on GSC every couple of days to see if the “Last Read” section beside your new sitemap has been updated. It’s normal for Google not to index everything on your site, especially if your website is quite large.
A large sitemap should be handled by splitting it into multiple files consisting of no more than 50,000 URLs or 50MB each. (Anything larger than that might result in some URLs not getting indexed.) You can add identifiers into the file names to keep track of them like sitemap1.xml, sitemap2.xml, etc.
You can see what Google has indexed in its Index Coverage Report. To find the report, click on “Coverage” on the left-side menu.

Pay attention to any errors as these mean Google can’t index something it would usually index. If you have an error, check the error status to see how to fix it. You should also browse through excluded pages to see what wasn't indexed. If you think Google incorrectly excluded something, read the reason for that page's exclusion and follow Google documentation to fix the issue. When you’re done, request a recrawl by using the “URL inspection” tool on GSC. Simply click "URL inspection" on the menu and then input the URL of your page.
Check Your Sitemap Regularly
Keep an eye on the "Coverage" section in Google Search Console as it effectively informs you of any crawling or indexing issues that your submitted URLs may have.
In this section, you can see the exact error with suggestions on how to fix it. A great tool to use for sitemap maintenance is Screaming Frog. By crawling your website or sitemap URL, this tool can check for any 404 or 5xx errors in the response code tab. Furthermore, if you are using an automatic sitemap generator tool or plugin, make sure to update it as soon as any updates are available.
You should periodically view the sitemap by going to your sitemap URL and checking whether any page is missing or if the last updated time is incorrect. By doing so, you can ensure that your sitemap is up-to-date and that there are no errors that could negatively impact your site's SEO.
6. Upload to Bing Webmaster and other search engines
Google isn’t the only player in town, but you might be forgiven for forgetting that sometimes. Remember to submit your sitemap to Bing, too, not only because Bing makes up 5.63% of search engine traffic in the U.S., but also because Bing shares indexing with Yahoo, which has an additional 2.99% market share. It might not be as much as Google, but for 10 minutes of your time, you’ll get better access to just shy of 10% of millions of searches.
To add your sitemap to Bing and Yahoo, head to Bing Webmaster Tools.
If you’ve not used Webmaster Tools before, your first step will be to sign up and verify your website. Luckily, if you’ve already set up your GSC account, you can verify your website through your Google account.
When you’re on the main page, click on “Sitemaps” on the left-side menu and then select “Submit sitemap.”
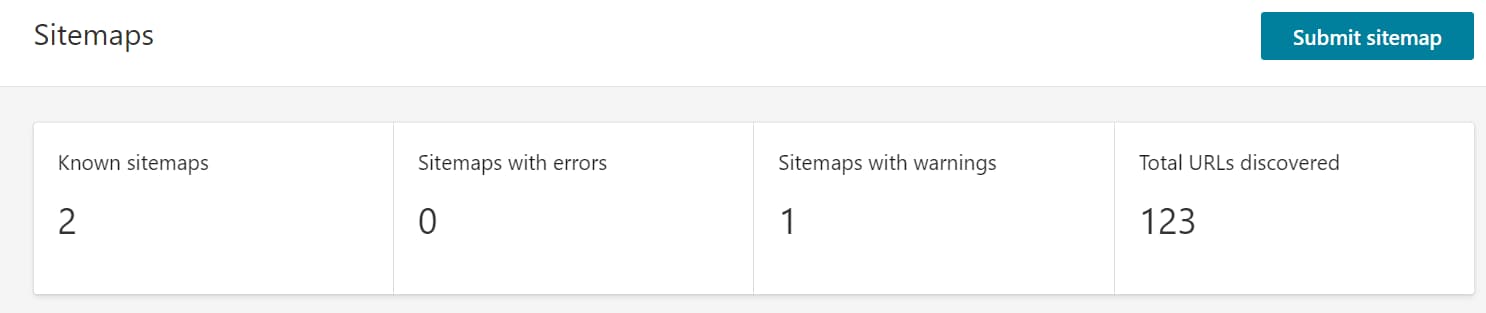
Add your sitemap URL, and you’re all done. Your sitemap is now known to both Bing and Yahoo search engines. As with Google, come back in a couple of weeks and make sure there are no indexing errors.
If your sitemap was automatically generated for you, you'll never need to think about this again as your sitemap is “dynamic” and will continually update itself. However, if you had to generate your sitemap yourself through Screaming Frog or xml-sitemaps.com, you have a static sitemap, and you'll want to update your sitemap whenever you make significant changes to your site. Simply follow these steps again, and you'll be ready to go.
Search Console is for more than just sitemaps
Search Console is your direct interface between you and Google’s search engine. You’ve already used it to submit a sitemap, but did you know it can do a lot more than that?
With Google Search Console, you can improve internal linking, find new keywords, and fix page experience issues on your site holding you back from even better Google rankings. You can learn about this and much more in our guide to Google Search Console insights.
